
Installing Sectona Launcher
When users are enabled to access target system connections like RDP, SSH and clients over native machines, the Sectona Launcher component must be installed on the user's machine. Sectona Launcher is a single point plugin on a local machine that launches any allowed access type to be accessed natively. Sectona Launcher aggregates and incorporates the full capability of single sign-on and session management on the local machine. This silent plugin is inaccessible for users and initiated upon activation of session from the browser.
Individual users can download the executable file from the individual console while another sophisticated way is to distribute the plugin via Windows Group Policy Objects. This section lists methods for installing and distributing the plugin.
Sectona Launcher communicates with Sectona Web Access component via ports 1080, 22, 23389. These ports are required for communicating to proxies at Sectona Web Access layer or for independent proxies installed elsewhere in your environment.
Launcher operates as a utility to retrieve launch components like RDP and SSH from the Web layer and downloads the components on user workstations. Sometimes this nature of the application is not whitelisted by several leading Endpoint Management or Antivirus products. If you find Sectona launcher to be blocked by your anti-virus system, then follow whitelisting guidelines to allow this exception.
This section covers
Before you begin
Ensure you have administrator rights on the client machine
Your network administrator has enabled the required port for communication with Sectona Web Access.
Installing Launcher on independent windows machines
If you would like to install the launcher file individually on a local machine, refer to the method listed below.
Once logged in as a user, go to Settings and then navigate to Download Utilities. Click on Sectona Launcher to download the Sectona.Launcher.msi file.
Double click on the downloaded file and click on the Run button to run the setup.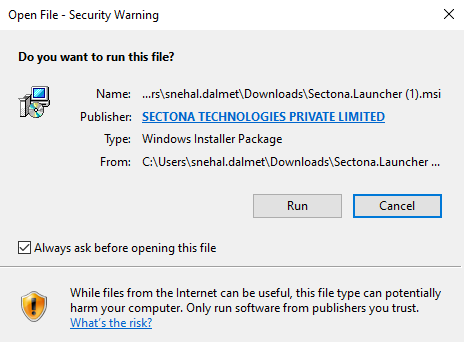
Click on the Next button.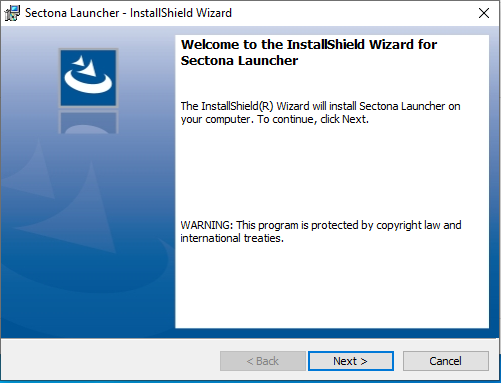
Click on the Install button to confirm the installation.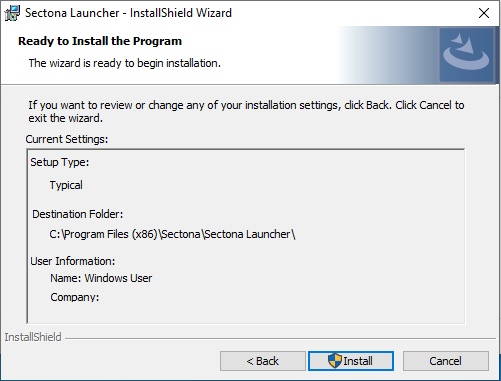
The installation process begins.
Click on the Finish button to complete the installation.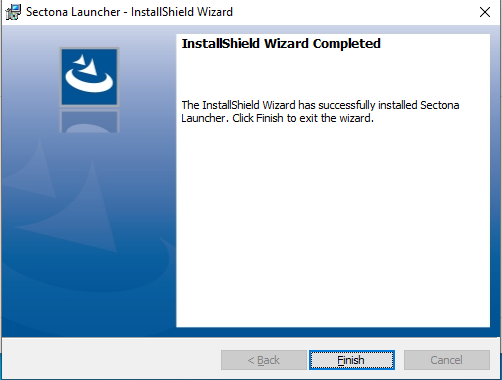
To automatically update Sectona Client on your system, click on Sectona Client (For Sectona Launcher). This will automatically update the Sectona Client on your system.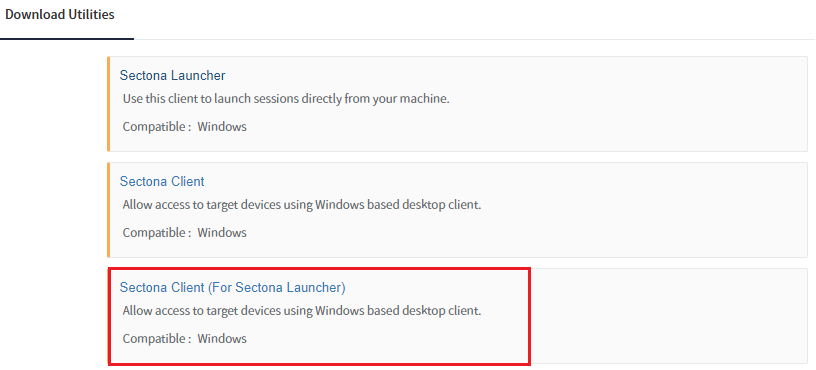
Pushing Sectona Launcher via Windows Group Policy Objects
This is a recommended method if you want to push a file to a set of users. Refer to the steps below to deploy an MSI on multiple machines by using Group Policy in Windows Server 2012 and Windows Server 2016.
Methods of deployment
Create a distribution point
Create a Group Policy Object
Assign an MSI package
Publish an MSI package
Methods of deployment
Group Policy supports two methods of deploying an MSI package:
Assign software : A program can be assigned per-user or per-machine. If it is assigned per-user, it will be installed when the user logs on. However, if it is assigned per-machine then the program will be installed for all users when the machine starts. Choose the method best suited for your environment.
Publish software : A program can be published for one or more users. This program will be added to the Add or Remove Programs list and the user will be able to install it from there.
Create a distribution point
The first step in deploying an MSI through GPO is to create a distribution point on the publishing server. This can be done by following these steps:
Log on to the server as an Administrator user
Create a shared network folder (this folder will contain the MSI package)
Set permissions on this folder to allow access to the distribution package
Copy the MSI in the shared folder
Create a Group Policy Object
An MSI package is deployed (distributed) through GPO as a Group Policy Object. In order to create an object for your package, you can follow these steps:
Click on the Start button and open Go to Start and open Group Policy Management
Expand Forest (your forest) > Domains (your domain)
Right-click on Group Policy Objects and select New
Enter a name for your policy and leave Source Starter GPO as (none)
Assign an MSI package
A package can be assigned per-user or per-machine. Also, if the package is assigned, it will automatically be installed silently. In order to assign a package, you can follow these steps:
Click on your previously created policy
In the right panel click on the Settings Tab
You should see Computer Configuration and User Configuration. Right-click anywhere in the panel and select Edit
Expand User Configuration > Policies > Software Settings
Right-click Software Installation and select New > Package
Select your package from the previously configured network share
In the dialog that appears select Assigned and click OK
The selected package will appear in the Software Installation panel (wait a bit for it to appear)
Double-click on the new package and select the Deployment tab
Check Install this application at logon and at the user interface select Basic
Click OK
Close Group Policy Management Editor
In the Group Policy Management window right-click on the domain name from the left-side panel and select Link an existing GPO
Select the previously created policy with the package and click OK
Publish an MSI package
When using Group Policy, you can publish a package to allow the target user to install it by using Add or Remove programs. The steps for publishing a package are:
Click on your previously created policy
In the right panel click on the Settings Tab
You should see Computer Configuration and User Configuration. Right-click anywhere in the panel and select Edit
Expand User Configuration > Policies > Software Settings
Right-click Software Installation and select New > Package
Select your package from the previously configured network share
In the dialog that appears select Published and click OK
The selected package will appear in the Software Installation panel (this will take time to appear)
Double-click on the new package and select the Deployment tab
Check Install this application at logon and at the user interface select Basic
Click OK
Close Group Policy Management Editor
In the Group Policy Management window right-click on the domain name from the left-side panel and select Link an existing GPO
Select the previously created policy with the package and click OK
Test the package:
Log on to the target computer
Click on the Start button and go to Control Panel
Double-click the Add or Remove programs applet and select Add New Programs
In the Add programs, from your network list select the program you published
Use the Add button to install the package
Click OK and then Close
Whitelisting Procedure for Sectona Launcher at Antivirus Level
In exception scenario, while using Sectona Launcher for the first time the user might get “The system cannot find the specified file specified“ error due to which eventually the user is unable to initiate any session.
This error occurs when the Endpoint Management or Anti-Virus solution blocks the required components of Sectona Launcher which gets downloaded on the end user’s machine in local AppData “temp“ or “Roaming“ directory (based on the configuration on Sectona application level). In Sectona PAM application configuration Sectona Launcher can be configured to download its required components either in the local AppData “temp“ or “Roaming“ directory on end user’s machine.
By default, the Sectona Launcher components get downloaded in the local “temp“ directory on end user’s machine. As these files are downloaded in user’s local temp directory, you might have a policy configured on your Endpoint Management or Anti-Virus solution to clear the temp directory after business hours every day. In this case, on the next day, the Sectona Launcher components will be getting downloaded again on the end user’s machine when the user attempts to access. To avoid this, you can change the Sectona Launcher components to get downloaded on the “AppData\Roaming“ directory.
To whitelist the Sectona Launcher components, in ”temp” add an exclusion for the below path in your endpoint management or anti-virus solution:
“C:\Users\%Username%\AppData\Local\Temp\Sectona“To whitelist the Sectona Launcher components in “Roaming” add an exclusion for the below path in your endpoint management or anti-virus solution:
“C:\Users\%Username%\AppData\Local\Roaming\Sectona“After adding exclusion, the end user’s machine will be able to access target servers/devices using Sectona Launcher.